


Face Detection with Python & DeepFace
A Hands-On Tutorial with DeepFace and Python for Beginners and Experts


In this tutorial, you will learn how to use DeepFace - a lightweight Python library to detect and extract the faces present in any given image.
Prerequisites
- Basic knowledge of Python 3 and its syntax.
- Python 3.0 installed on your computer and added to your PATH (environment variables).
- Jupyter Notebook (recommended).
Problem Statement
Given an image as input, write a program to identify the face(s) present within the image, extract these faces, and store them on your local machine.
Here's a sample image which would be used throughout this article:

To solve this, the problem is broken into small steps:
1. Face Detection: detect the location of the face in the image
2. Bounding Box Placement: Draw a colored bounding box around the detected face
3. Crop out the face
4. Store it on the local machine
Later on in this article, complex use cases and real-life applications of this technology will be discussed!
Who's excited!!
Let's jump right in🎉
Environment Setup
Create a new folder on your machine and set up your virtual environment as follows:
# Create a new folder/directory
your_path> mkdir face_rec_tutorial

# Navigate to the new folder
your_path> cd face_rec_tutorial

# Create a new environment named 'env' in the current directory
your_path/face_rec_tutorial> py -m venv env

# Activate the virtual environment
your_path/face_rec_tutorial> env\Scripts\activate

# You should see (env) before your_path after
# activating the virtual environment
If you faced any issues creating the virtual environment, here is a detailed guide to setting it up on Windows. If you're using a Mac or Linux-based operating system, this should help.
Install 3rd Party Libraries
Next, install the 3rd party libraries, namely
- DeepFace (version 0.0.793)
- opencv-python (version 4.7.0.72)
If you don't have pip, install it using these instructions for Windows OS. For Mac and Linux OS, follow these instructions.
  # Install OpenCV and DeepFace libraries
  (env) your_path/face_rec_tutorial> pip install opencv-python deepface
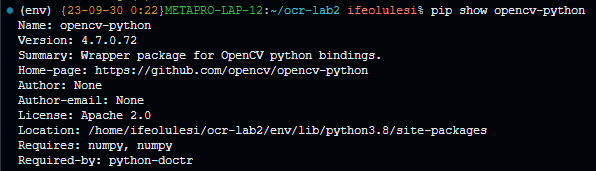
To confirm if both libraries downloaded successfully, run the following code:
  # Ask pip to display info of the opencv-python package
  # This will only work if it was downloaded successfully
  (env) your_path/face_rec_tutorial> pip show opencv-python
If the install was successful, then you should get an output similar to this:
If not, then you should get a warning similar to this:

Now that's out of the way, create a new Python (Jupyter Notebook) file within the face_rec_tutorial folder, and let's get started💃🏼
Step 1: Face Detection
To detect the faces present in the image, start by importing the 3rd party libraries you just installed, like so:
from deepface import DeepFace
import cv2
Next, get the location of your sample image and store it in a variable:
img_path = 'images/samples/pexels-stefan-stefancik-91227.jpg'
You can download the image shown earlier if you like!
Now, call the extract_faces function from the DeepFace library to analyze the sample image:
detected_faces = DeepFace.extract_faces(img_path= img_path, target_size=(500,500))

# Print out the result
print(detected_faces)
You should get a result similar to this:
[
  {
    'face': array([
      [
        [0.37254903, 0.3529412, 0.38039216],
        ...
      ],
      ...
    ], dtype=float32),
    'facial_area': {
      'x': 401,
      'y': 57,
      'w': 96,
      'h': 96
    },
    'confidence': 7.582192166126333
  },
]
This array contains information about all detected faces within the image.
Each detected face is represented as an object which contains three properties face, facial_area, and confidence
The facial_area property contains useful information about each face within the image, which you'll use to draw a colored bounding box around it later.
Since the image used in this example contains just one face, you can pick out the facial_area as follows:
face_data = detected_faces[0]['facial_area']
print(face_data)
If the image contains multiple faces, a simple iteration would do the trick - here's how:
face_data = []
for face in detected_faces:
  face_data.append(face['facial_area'])

print(face_data)
However, for this tutorial, we'll work with a single face per image.
Congratulations on making it this far!🎉
Here's what your script should currently look like:
from deepface import DeepFace
import cv2

IMG_PATH = 'images/samples/pexels-stefan-stefancik-91227.jpg'
detected_faces = DeepFace.extract_faces(img_path= IMG_PATH, target_size=(500,500))

face_data = detected_face[0]['facial_area']
print(face_data)
Now, on to the next step🚀
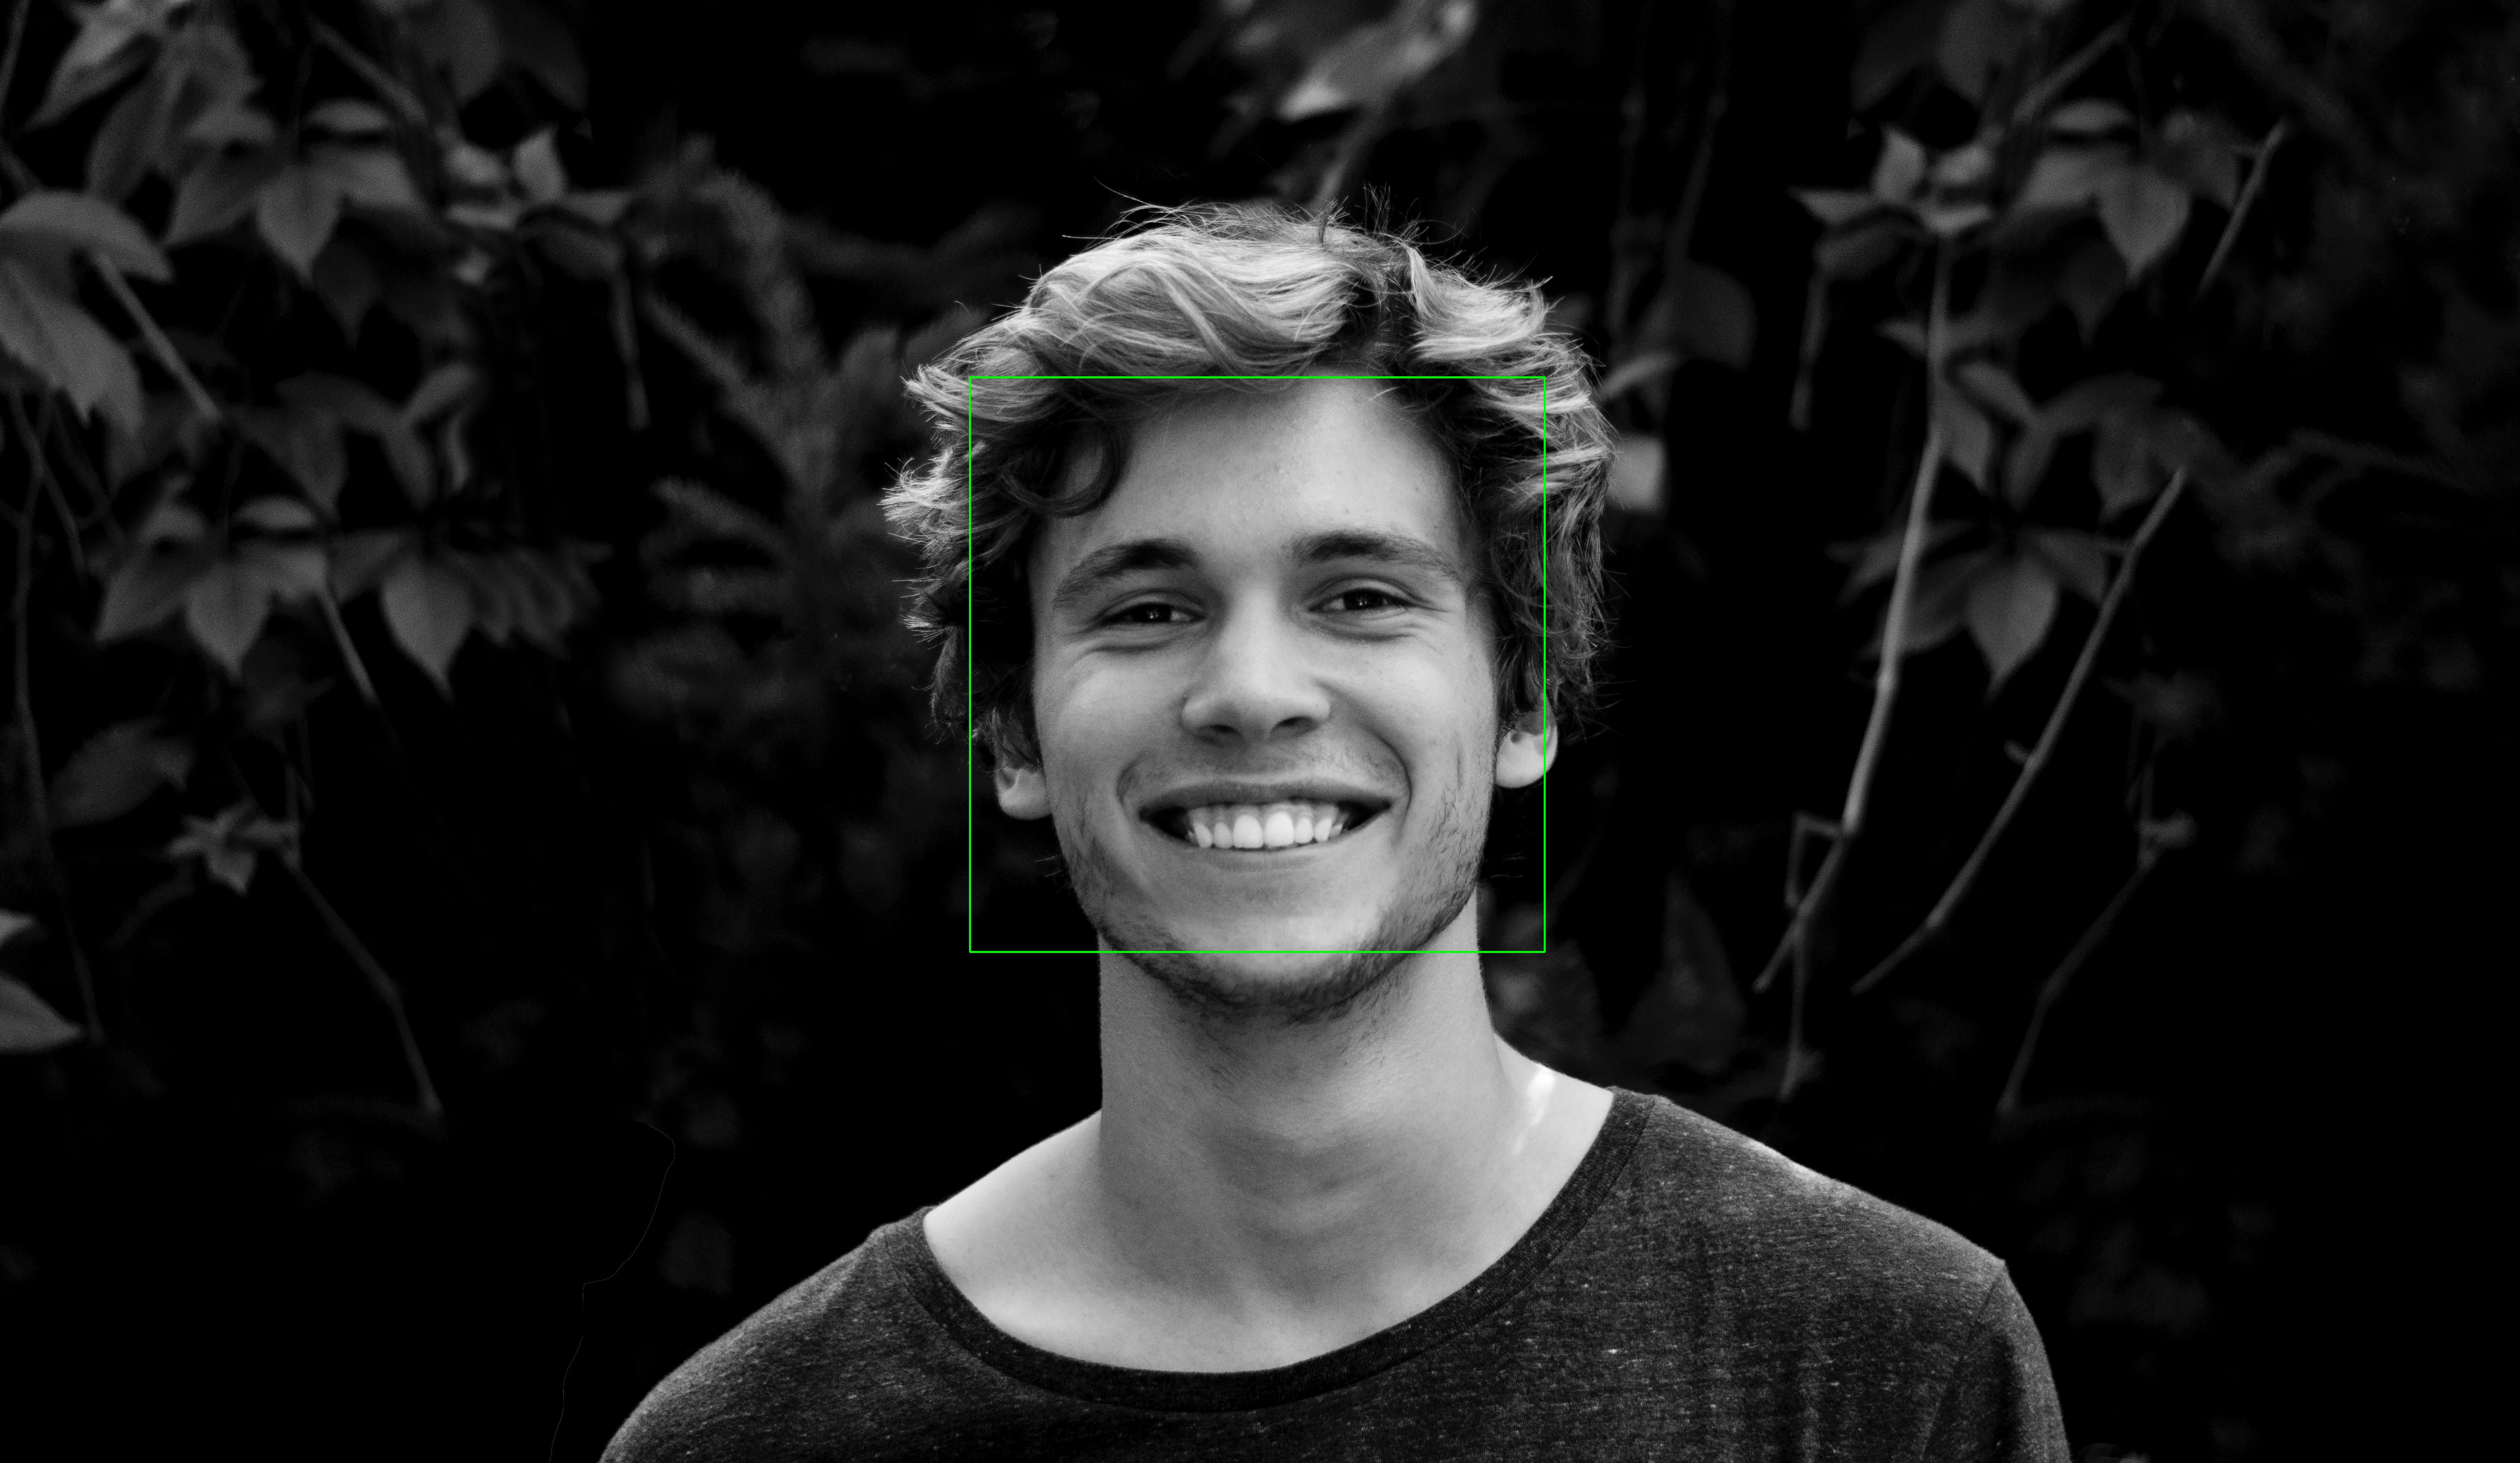
Step 2: Bounding Box Placement
In this section, you'll learn to place a colored bounding box around the face!
Here's what it's going to look like 😉
Firstly, import the image using the open-cv library installed earlier:
cv_img = cv2.imread(IMG_PATH)
Next up, you need to identify two coordinates - namely the Start Point, and the End Point.
Here's a visual for easier understanding.
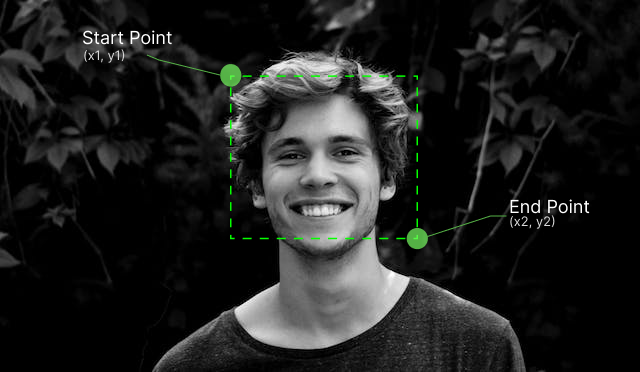
Thankfully, the data needed for this is already stored in the face_data variable:
# face_data[0]
{'x': 73, 'y': 93, 'w': 254, 'h': 254}
To make things neat, extract the data from the face_data dictionary like so:
x1, y1, width, height = face_data[0].values()
Sweet! Now, declare the co-ordinates:
START_POINT = (x1, y1)
END_POINT = (x1 + width, y1 + height)
Then set the color and thickness attributes for the lines of the bounding box:
GREEN = (0, 255, 0) # Color in BGR format
THICKNESS = 4 # in pixels
Now, draw the bounding box using the rectangle method from open-cv library.
face_with_box = cv2.rectangle(cv_img, START_POINT, END_POINT, GREEN, THICKNESS)
Congrats 🥳
But you can't see it yet, right?
One way around this is to save the new image (with a bounding box) to the file system.
It's just one line:
cv2.imwrite("path_to_save_new_image.jpg", face_with_box)
Open up the saved image to see how it looks! Refer to the beginning of this section to see how mine came out!
Here's the script so far
from deepface import DeepFace
import cv2

# Detect face info with DeepFace
IMG_PATH = 'images/samples/pexels-stefan-stefancik-91227.jpg'
detected_faces = DeepFace.extract_faces(img_path= IMG_PATH, target_size=(500,500))

face_data = detected_face[0]['facial_area']
print(face_data)

# Bounding Box Placement
cv_img = cv2.imread(IMG_PATH)

x1, y1, width, height = face_data[0].values()

START_POINT = (x1, y1)
END_POINT = (x1 + width, y1 + height)
GREEN = (0, 255, 0) # Color in BGR format
THICKNESS = 4 # in pixels

face_with_box = cv2.rectangle(cv_img, START_POINT, END_POINT, GREEN, THICKNESS)

# Save the image with the bounding box
cv2.imwrite("path_to_save_new_image.jpg", face_with_box)
Bonus - Face Cropping Operation 🎉
Cropping the face is somewhat similar to how you draw a rectangle around the face, but slightly different.
Instead of:
START_POINT = (x1, y1)
END_POINT = (x1 + width, y1 + height)
do this instead:
Y_START = y1
Y_END = y1 + height

X_START = x1
X_END = x1 + width
and then, crop the image:
cropped_image = cv_img[ Y_START: Y_END , X_START: X_END ]
This line of code performing the cropping operation truncates the image array - since images are represented in OpenCV as an n-dimensional array.
Conclusion
Congrats on making it to the end!🚀
I hope it was helpful to you.
You can find the code, sample images, and other resources here.
Further Steps & Advanced Use Cases
Here's a list of real-world scenarios you could apply this technology to:
- Face Detection for Security
- Face Detection in Healthcare Diagnosis & Monitoring
- Augmented Reality Apps & Filters
- Emotion Recognition in Marketing & User Research
Credits
Shout out to Sefik Ilkin Serengil for the great work on DeepFace! 🎉
Image by starline on Freepik